How to Stop a Computer From Continuously Restarting
With Windows 10, Microsoft makes it difficult to turn off or disable the Windows Update function. While it is important to keep your operating system updated, the automatic system restart after every update makes it more annoying.
In this article, we will discuss possible ways to disable Windows 10 automatic restart, especially after installing the update or on system failure. This will save you from annoyance and sudden data loss.
Please note that the following tips are to disable Windows 10 automatic restart for future updates. If you have already installed Windows updates and want to disable the restart process, you may refer to the following article:
Disable or Bypass Pending Updates On Restart/Shutdown In Windows 10
Table of contents
- Disable Automatic Restart Using Group Policy Editor
- Enable the Configure Automatic Updates Policy
- Enable the No Auto-Restart Policy
- Disable Automatic Restart Using Registry Editor
- Disable Automatic Restart using the Task Scheduler
- Stop Automatic Restart on System Failure (BSOD)
Disable Automatic Restart Using Group Policy Editor
There are two ways to prevent automatic restart of the computer using the Group Policy Editor.
- By configuring the automatic updates policy
- By configuring the No Auto-Restart Policy
We will discuss both ways here.
Enable the Configure Automatic Updates Policy
-
Open the Group Policy editor by typing in gpedit.msc in the Run Command box.
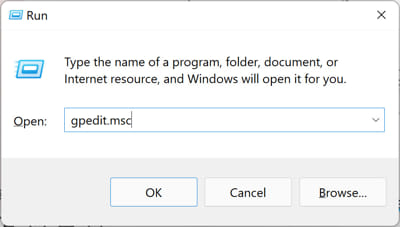
Open Group Policy editor -
Now navigate to the following from the left pane:
Computer Configuration >> Administrative Templates >> Windows Components >> Windows Update
-
Here, double-click the policy "Configure automatic updates."
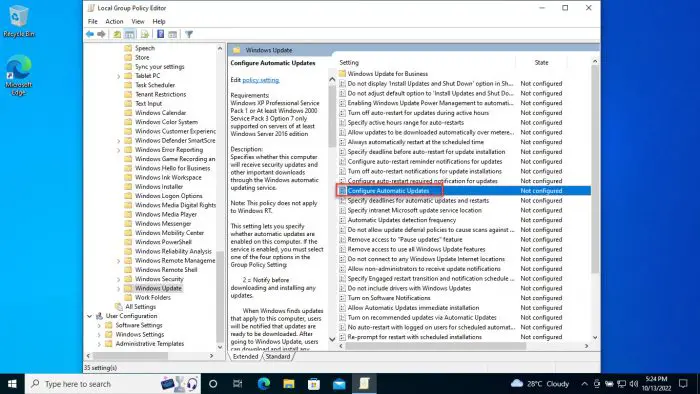
Open policy -
Select the Enabled radio button, and then click Apply and Ok.
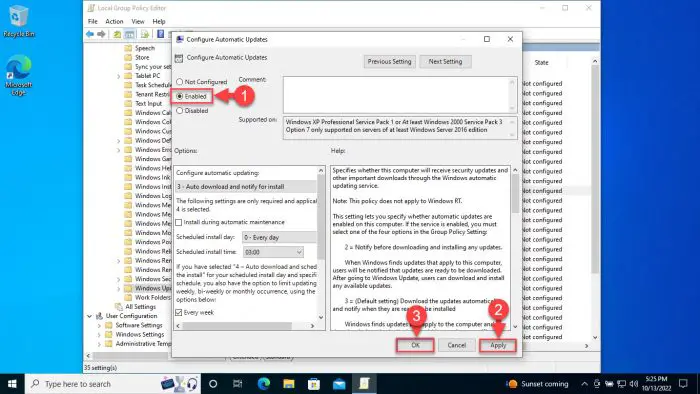
Enable the policy -
Now run the following cmdlet in an elevated Command Prompt for the changes to be implemented.
gpupdate /force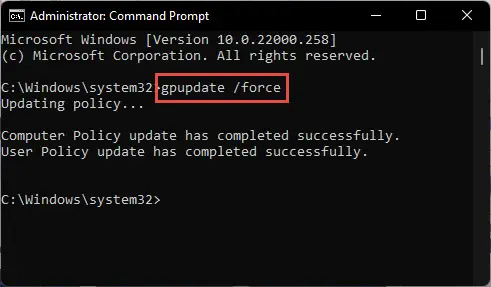
Implement changes -
Now open the Windows Update Settings page and you shall see the following written there:
Some settings are managed by your organization
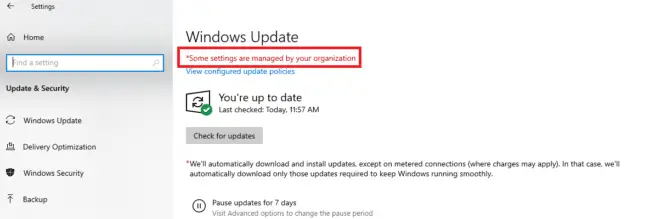
Settings managed by organization message This means that the group policy we had previously enabled has been applied. You may now click Check for Updates, and the updates will be installed, but will only apply when you click Install Now.
-
When you are ready to update your PC, click Install now, and then manually restart your computer to finalize it.
Enable the No Auto-Restart Policy
-
Open the Group Policy editor by typing in gpedit.msc in the Run Command box.

Open Group Policy editor -
Now navigate to the following from the left pane:
Computer Configuration >> Administrative Templates >> Windows Components >> Windows Update
-
In the right pane, double-click "No auto-restart with logged on users for scheduled automatic update installations."
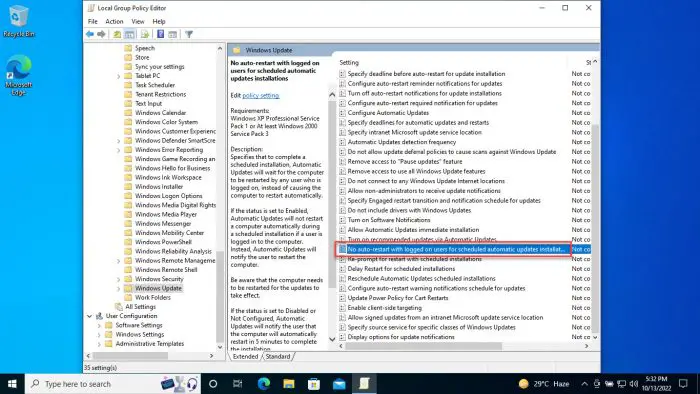
Open policy settings -
From the Policy Properties window, select the Enabled radio button, and then click Apply and Ok.
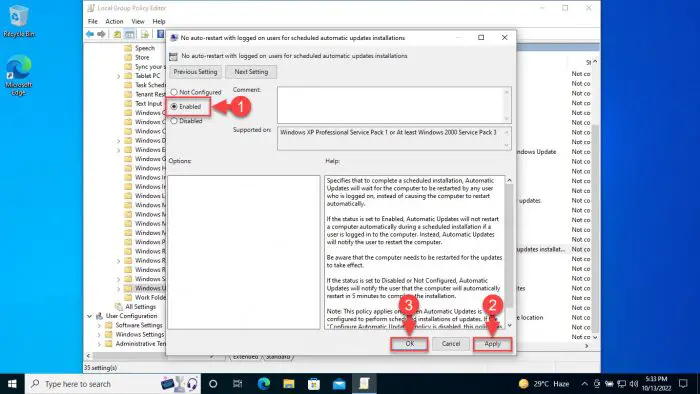
Enable the policy -
Now run the following cmdlet in an elevated Command Prompt for the changes to be implemented.
gpupdate /force
Implement changes
Now, your computer won't restart automatically and the Windows updates will be enforced when you reboot it manually.
Disable Automatic Restart Using Registry Editor
You can also prevent your Windows PC from rebooting automatically through the Registry editor. Adopting this method will ensure that the computer doesn't restart as long as a user is logged in.
Note: Misconfiguration of critical values in the system's registry could be fatal for your operating system. Therefore, we insist that you create a system restore point before proceeding forward with the process.
-
Open the Windows Registry editor by typing in regedit in the Run Command box.

Open Registry editor -
Now paste the following in the address bar at the top for quick navigation:
Computer\HKEY_LOCAL_MACHINE\SOFTWARE\Policies\Microsoft\Windows

Quick navigation in Registry editor -
Now right-click on the Windows key, expand New, and then click Key from the context menu. Name this key "WindowsUpdate."

Create new WindowsUpdate key -
Now right-click the newly-created "WindowsUpdate" key, expand New, and then click Key again. Name this key "AU."

Create new "AU" key -
Now right-click on the newly-created "AU" key, expand New, and then click DWORD (32-bit) Value from the context menu. Name this DWRD "NoAutoBootWithLoggedOnUsers."

Create new NoAutoBootWithLoggedOnUsers DWORD -
Now double-click on the "NoAutoBootWithLoggedOnUsers" DWORD, change its Value Data to 1, and then click Ok.

Configure Value Data -
Now restart your computer for the changes to take effect
This will disable automatic Windows 10 restart when a user is logged on to the computer.
Disable Automatic Restart using the Task Scheduler
By default, Windows 10 is bound to reboot after it has downloaded and installed Windows updates. This is a task that is already scheduled in the Task Scheduler. This utility is used to perform a series of tasks in a routine, or if they are triggered by an event.
This method is especially useful for Windows 10 Home users who don't have a Group Policy editor on their systems.
Learn how to install gpedit.msc in Windows 10 Home.
-
Open the Task Scheduler by typing in taskschd.msc in the Run Command box.

Open Task Scheduler -
In the Task Scheduler, navigate to the following in the left pane:
Task Scheduler Library >> Microsoft >> Windows >> UpdateOchestrator
-
In the middle pane, right-click Reboot_AC and click Disable.
-
Then right-click Reboot_Battery and click Disable.

Disable automated tasks
By performing the above steps, the computer will not restart without your input.
Stop Automatic Restart on System Failure (BSOD)
Follow these steps to stop automatic restart if there is a critical system failure or if the system encounters a Blue Screen of Death.
-
Open the Advanced System Settings window by typing in systempropertiesadvanced in the Run Command box. This will open the Advanced tab directly.

Open Advanced System Properties You can also open Advanced System Properties by going to Windows Settings > System > About > Advanced System Settings.
-
Here, click Settings under Startup and Recovery.

Startup and Recovery settings -
Now uncheck the box next to Automatic restart under System failure and then click Ok

Disable automatic restart This stops the computer to restart on system failure.
-
Click Ok again on the System Properties window to close it.
Now your computer will not reboot even if it fails entirely, and you will likely not see a Blue Screen of Death. However, we do not recommend that you do this since the BSoD is there to prevent permanent damage to your system.
How many times have you been drawn back by the automatic restart feature in Windows 10?
Also see:
Subscribe to our Newsletter
Get the latest tech news, advice and downloads in your inbox

Source: https://www.itechtics.com/disable-automatic-restart/
0 Response to "How to Stop a Computer From Continuously Restarting"
Post a Comment